Post 3 (Flask)
Let’s create an interactive website with Flask!
The website should do 2 things:
- Allow the user to submit messages to the bank.
- Allow the user to view a sample of the messages currently stored in the bank.
Here is the post’s general layout:
- Create a Flask app
- Construct the Submit Page
- Construct the View Page
- Render the Templates in
__init__.py - Make the Website Prettier with CSS
You can find all the files I used in my Github repository https://github.com/shizuchanw/flask_dbinteraction.
Let’s dive into it!
1. Create a Flask app
We will be using the python package flask for this task. Make sure it’s installed correctly before we start.
To create a flask app, create a folder called app. Then inside of it, create a folder called templates, and a .py file called __init__.py.
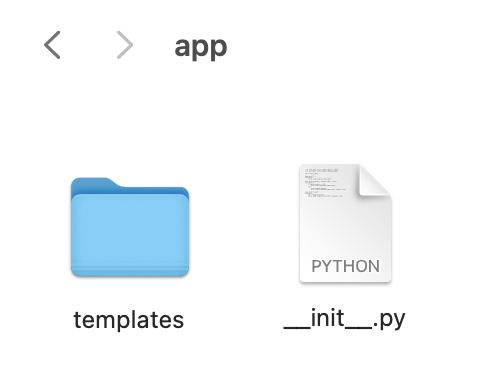
the app folder: contains all the files for the flask app
the templates folder: contains all the html templates the flask app will be using
__init__.py: the first file the app goes to when running
We’ve created a Flask app! Now we can start developing by typing the following command into the commandline tool (after you go into the app directory):
export FLASK_ENV=development
flask run
The first line gets you in the development mode (debugger would be active), and the second line runs the flask app.
Then your Flask website should be running in localhost:5000, or the link http://127.0.0.1:5000/ given in instruction.
2. Construct the Submit Page
First, we will construct the Submit page, where the user can submit messages to the bank.
We will do this by 2 steps:
- write the html template
- construct the backend python program
a. write the html template
We wish to first write a template of navigation called base.html. Then we can make our other templates extend from that template.
jinja tag: pairs of {%%}{%%} tags. We put it in our template to indicate that these content can be written over.
For example, we wish to have a different header for each page. Thus we would include a pair of {% block header %}{% endblock %} jinja tages inside the
In the pages that extend this template, we don't have to write any html outside the jinja tags; we can just put {% block header %}title{% endblock %} to overwrite what's in the template.
Some HTML basics:
<!doctype html>: necessary for each HTML file, declaring the code language
<title></title>: the title of the website that shows up in the browser tab
<nav></nav>: tags for navigation bar
<h1></h1>: the head title. As the number increases, the title gets smaller
<ul></ul>: tags enclosing unordered lists. Similarly, there are <ol></ol> tags for ordered lists
<li></li>: tags for each listed item in a list
<section></section>: tags enclosing a section
<header></header>: tags for the header of a page
class, id: helps labeling specific tag(s)
<a href></a>: tags for hyperlinks
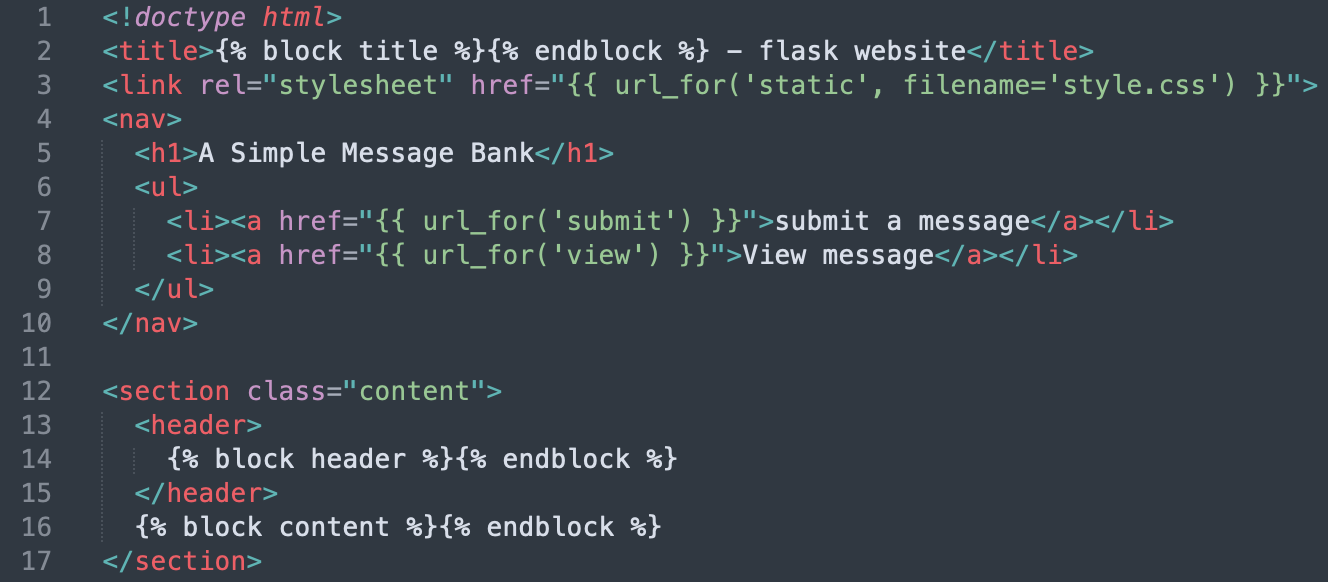
Thus the code for base.html should look like this:
<!-- declare the language -->
<!doctype html>

<!-- declare title -->
<!-- we use jinja tag here so it can be overwritten -->
<title>{% block title %}{% endblock %} - flask website</title>

<!-- links this template to the CSS stylesheet -->
<link rel="stylesheet" href="{{ url_for('static', filename='style.css') }}">

<!-- navigation bar -->
<nav>
  <h1>A Simple Message Bank</h1>
  <ul>
    <!-- 'submit' and 'view' refer to functions in `__init__.py` -->
    <li><a href="{{ url_for('submit') }}">submit a message</a></li>
    <li><a href="{{ url_for('view') }}">View message</a></li>
  </ul>
</nav>

<!-- create a section for contents -->
<!-- we use jinja tags here so they can be overwritten -->
<section class="content">
  <header>
    {% block header %}{% endblock %}
  </header>
  {% block content %}{% endblock %}
</section>
In text editor is looks like this:
We can now understand it easily with the jinja tag and HTML basics we just learned above.
Now we have our template base.html. Let’s create the submit.html based on this!
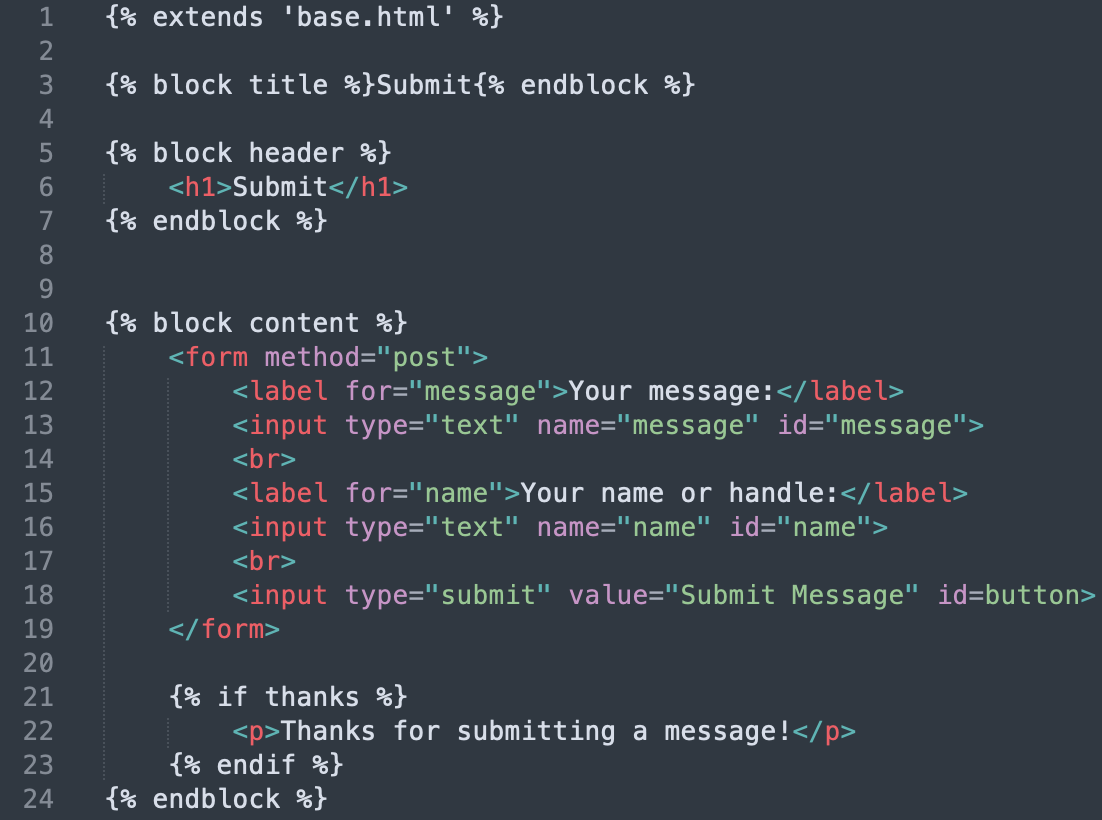
First, we wish to extend from our template base.html. We also wish to replace the title and header. Thus the first few lines should look like this:
<!-- extend from template -->
{% extends 'base.html' %}

<!-- overwrite title -->
{% block title %}Submit{% endblock %}

<!-- overwrite header -->
{% block header %}
	<h1>Submit</h1>
{% endblock %}
Then, we want to create 3 interface elements:
- a text box for submitting a message.
- a text box for submitting the name of the user.
- a “submit” button.
We can do so with the <input> tags. (Note: these tags are not in pairs.)
{% block content %}
  <form method="post">
    <!-- textbox for message -->
    <label for="message">Your message:</label>
    <input type="text" name="message" id="message">
    <br>
    <!-- textbox for name -->
    <label for="name">Your name or handle:</label>
    <input type="text" name="name" id="name">
    <br>
    <!-- submit button -->
    <input type="submit" value="Submit Message" id=button>
  </form>
{% endblock %}
We also wish to give thanks to the user when they submit a message. Thus we can pass in a variable thanks from __init__.py, and use a if statement in jinja tags to achieve that.
  {% if thanks %}
    <p>Thanks for submitting a message!</p>
  {% endif %}
We’re done with the Submit page! Here is the final code for submit.html:
b. construct the backend python program
We can now construct the backend python program for this page!
First, let’s create a python program app.py for all the functions we’ll be using.
Next, let’s import the necessary packages.
from flask import Flask, g, request, current_app
import sqlite3
Some tools imported from flask:
Flask: the flask object we’ll be running with
g: stands for global; it’s a name space variable that allows you to store data that is unique to a request
request: request context allows you to obtain data sent from the client
current_app: it is used to access data about the running application
In app.py, we will write 2 functions for database management: get_message_db() and insert_message(request).
i. get_message_db()
First, we wish to check whether we’re already connected to the database. If not, we wish to connect to/create it.
Second, we wish to check whether the table messages is in the database. This table should be our “message bank” that stores user input. It checks with sql command file init.sql, and the command inside it looks like this:
CREATE TABLE IF NOT EXISTS messages (
	id INTEGER PRIMARY KEY AUTOINCREMENT,
	handle TEXT,
	message TEXT
);
Finally, return the connection to the database so that it can be used in other functions.
The final code for the function looks like this:
def get_message_db():
  """
  This function handles creating the database of messages.
  It also creates a table messages if not existed.
  """

  # check whether message_db is in g
  if "message_db" not in g:
    g.message_db = sqlite3.connect("message_db.sqlite")

  # check whether the table messages is in message_db
  with current_app.open_resource('init.sql') as f:
    g.message_db.executescript(f.read().decode('utf8'))

  # return the connection g.message_db
  return g.message_db
ii. insert_message(request)
First, we will have the context of request from our html template submit.html. The request is passed in as an argument. Thus, we can get the variables from the request with this argument.
Second, we connect to the database with get_message_db() we just created.
Next, we add the messages we pulled from the request to the database with sql command we learned in POST 2. Note: it is necessary to run db.commit() after inserting a row into db in order to ensure that your row insertion has been saved.
Finally, we can drop the database variable from g, and close the connection.
The final code for the function looks like this:
def insert_message(request):
	"""
	This function handles inserting a user message into the database.
	It connects to the database with get_message_db(),
	and closes the connection once it's done.
	"""

	# get the variables from request
	name = request.form['name']
	message = request.form['message']
	# connect to database
	db = get_message_db()

	# add the variables to the database
	db.execute(
		'INSERT INTO messages (handle, message) VALUES (?, ?)',
		(name, message)
		)
	db.commit()

	# close connection to the database
	g.pop('message_db', None)
	db.close()
Now we’re done with the Submit page! We will utilize everything we just created in step 4: Render the Templates in __init__.py.
3. Construct the View Page
Similarly, we will construct the View page, where the user can view some random messages submitted to the bank.
We will also do this with the same 2 steps, but in opposite order:
- construct the backend python program
- write the html template
a. construct the backend python program
Continue in app.py, we will write a function random_messages(n) which will return a collection of n random messages from the message_db, or fewer if necessary.
First, we connect to the database with get_message_db().
Next, we pulled messages from the database with sql command we learned earlier. With .fetchall(), the data pulled will be in the form of a dataframe.
Finally, return the dataframe of messages we just created.
The final code for the function looks like this:
def random_messages(n):
  """
  This function return a collection of n random messages
  from the message_db, or fewer if necessary.
  """

  # connect to database
  db = get_message_db()

  # get n messages from the database
  msg = db.execute(
    f'SELECT handle, message FROM messages ORDER BY RANDOM() LIMIT {n}'
    ).fetchall()

  return msg
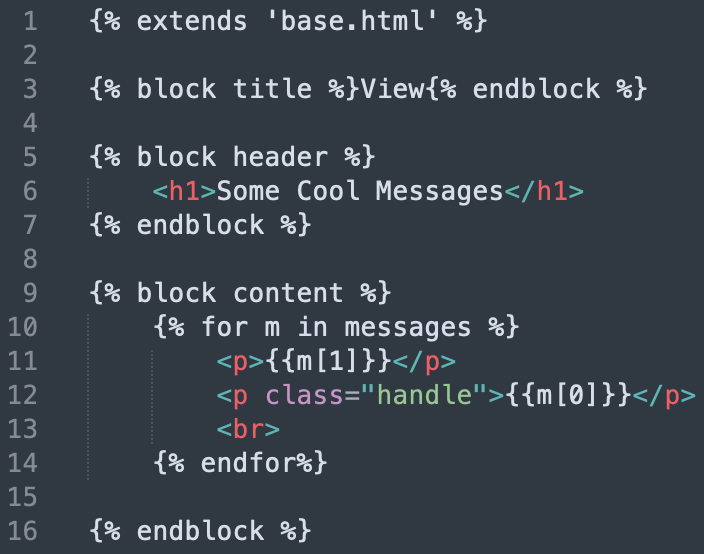
b. write the html template
Likewise, we can make our template view.html extend from base.html.
First, we wish to extend from our template base.html. We also wish to replace the title and header. Thus the first few lines should look like this:
<!-- extend from template -->
{% extends 'base.html' %}
<!-- overwrite title -->
{% block title %}View{% endblock %}
<!-- overwrite header -->
{% block header %}
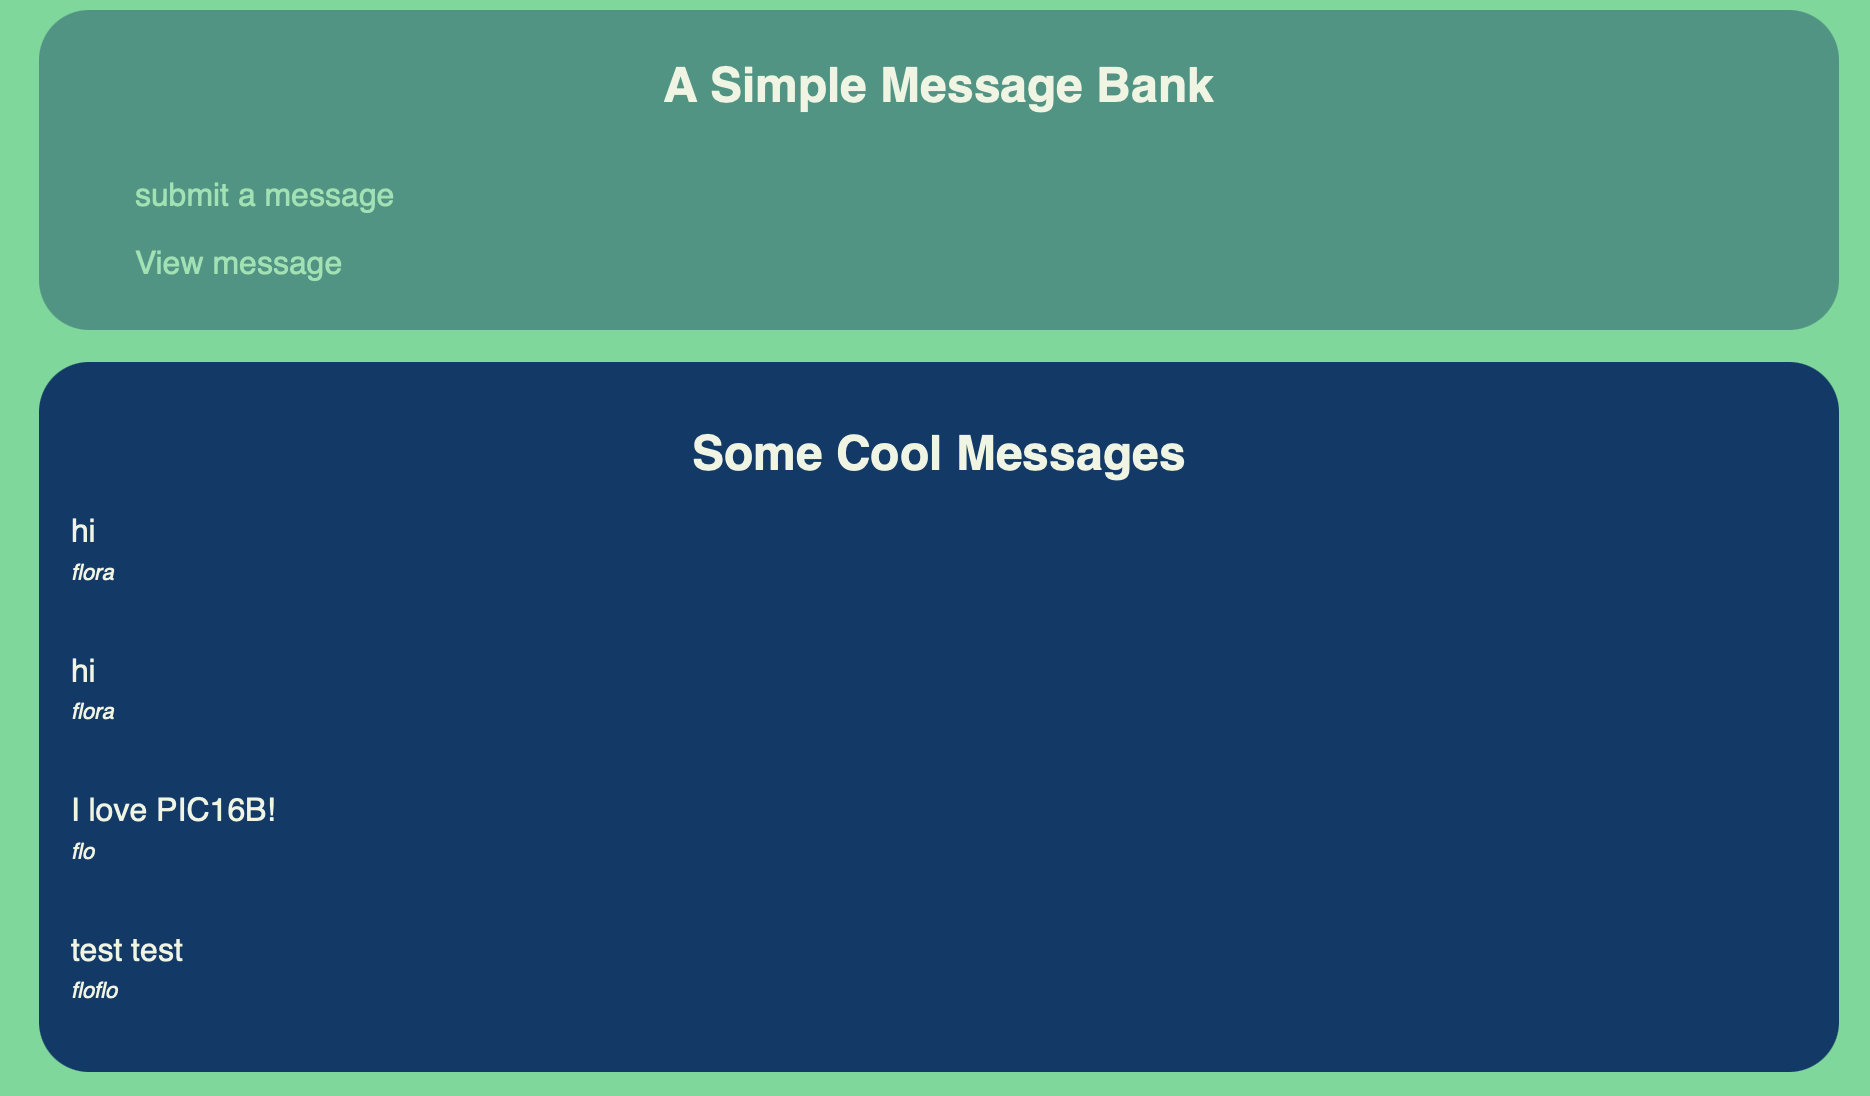
<h1>Some Cool Messages</h1>
{% endblock %}
Then, we want to display the dataframe of messages extracted from random_messages().
Since Jinja tags support looping, we can loop over the rows in the dataframe for each paragraph <p> of message.
{% block content %}
  {% for m in messages %}
    <p>{{m[1]}}</p>
    <p class="handle">{{m[0]}}</p>
    <br>
  {% endfor%}
{% endblock %}
We’re done with the View page! Here is the final code for view.html:
4. Render the Templates in __init__.py
We’ve created all the functions and templates needed! Now, let’s render the templates in __init__.py.
First, let’s import necessary packages:
from flask import Flask, render_template, request
from .app import insert_message, random_messages
render_template: this function renders the template we just created in folder templates
We also imported the functions we just wrote in app.py.
Now, let’s create a Flask object.
app = Flask(__name__)
@app.route(): this code refers to the page we’ll be working on. For example, the main page will be @app.route("/").
POST: when the web server accepts the data
GET: when the server send back a given resource
For the Submit page, we wish to just render the template submit.html when the method is ‘GET’.
After the user submit the message, the method would be ‘POST’, and we wish to call insert_message(request) to insert the message into the database, and give thanks to the user.
Thus the code for the Submit page looks like this:
@app.route("/submit/", methods=['POST', 'GET'])
def submit():
    if request.method == 'GET':
        return render_template("submit.html")
    else:
        insert_message(request)
        return render_template("submit.html", thanks = True)
For the View page, we wish to use the function random_messages(n) to pull n random messages from the database. I set it to 5.
After that, we wish to render the template view.html. The messages we just pulled can be used in the template as an argument messages as we wrote it in step 3!
Thus the code for the View page looks like this:
@app.route("/view/")
def view():
    msg = random_messages(5)
    return render_template("view.html", messages = msg)
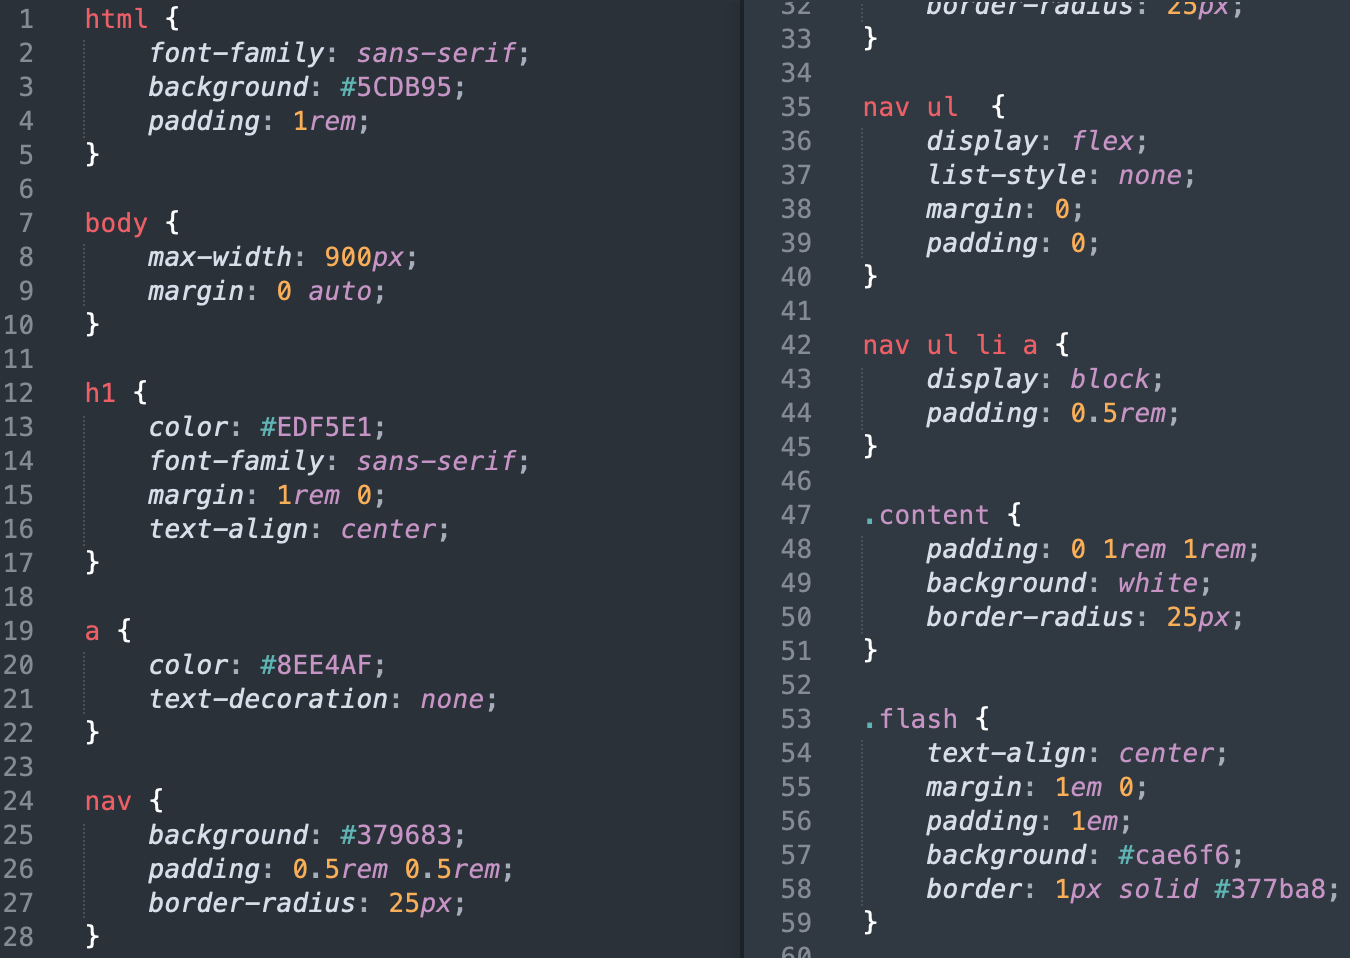
5. Make the Website Prettier with CSS
To make you website prettier, we can write code in a CSS file and link it to our base.html template. We need to create a folder called static in our app folder, and create a CSS file inside this folder.
This step involves optional learning about the CSS language. Below is how I constructed my CSS:
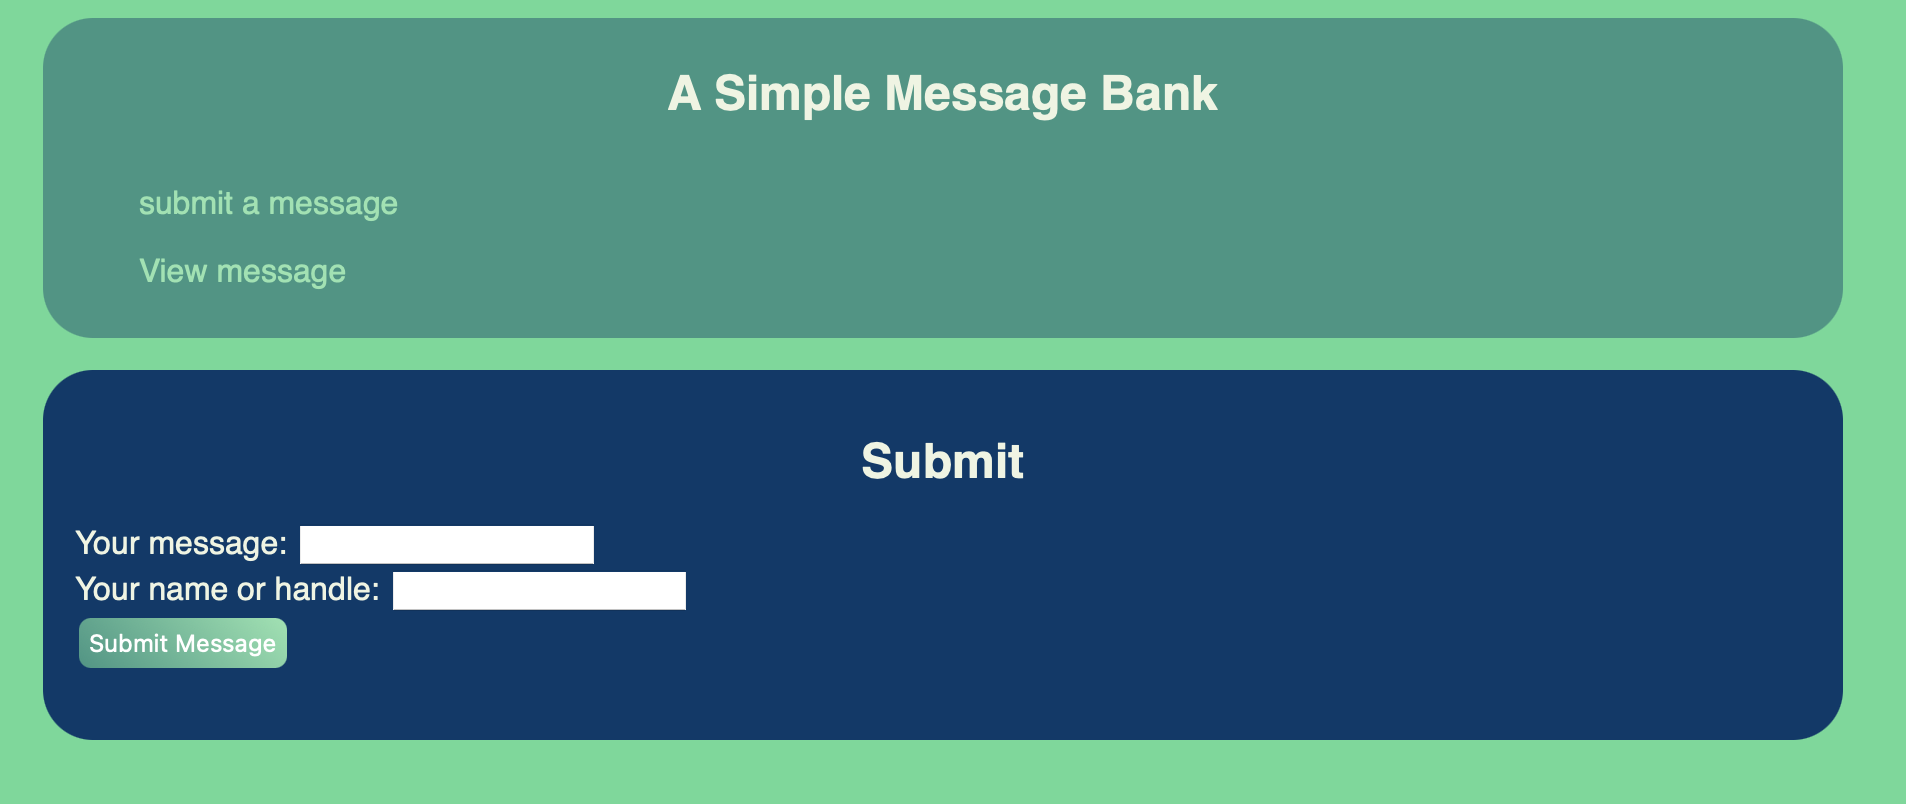
Now we’re done with this Flask app! When we go to localhost:5000/submit/, it looks like this:
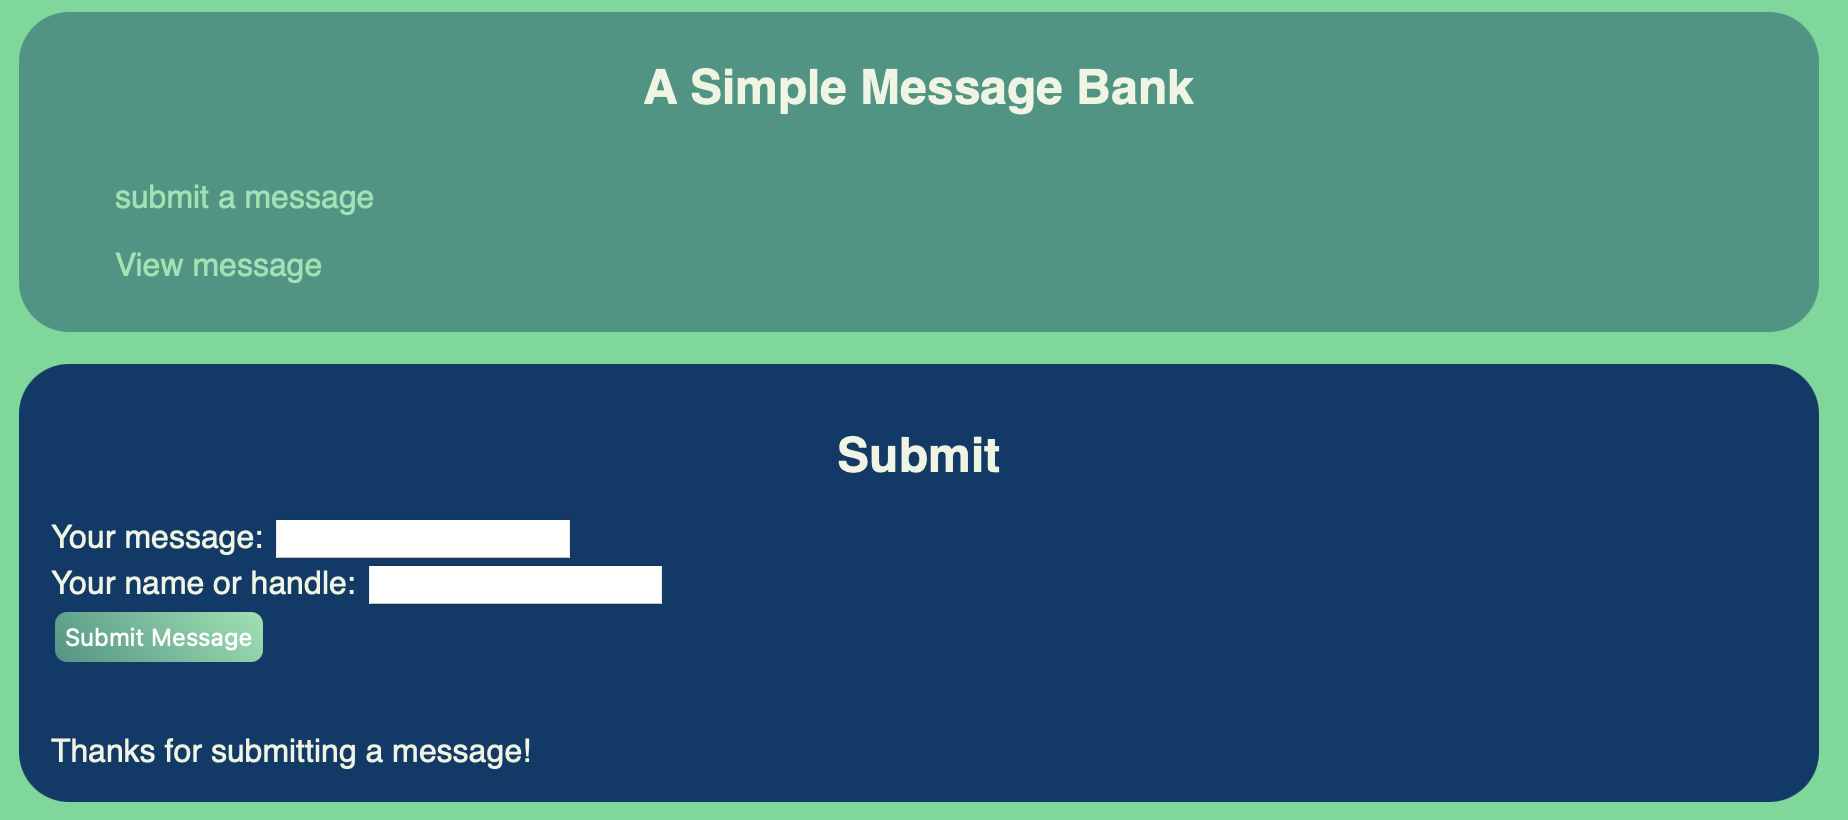
After we submit a message, it should look like this:
Our View page (localhost:5000/view/) looks like this: